Awesome Contact Form Widget for Blogger
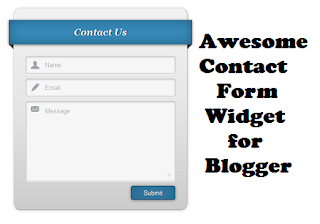
 Today I am going to show you how you can add a really awesome and cool looking Contact form in a page of your blogger blog. This contact form looks really elegant and is very eye-catching.
This contact form inspired from Bloggertut works on CSS and has a very rich feel in it. You can make your Contact page more awesome by adding this widget to one of your blog's pages. A live working demo of this widget can be seen by clicking the below button.
After seeing the demo if you wish to add this contact form in your blog then follow the steps below.
1. Adding The CSS
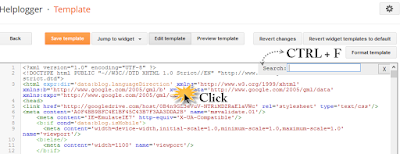
Step 1. Go to Blogger Dashboard > Template > click on the Edit HTML button:

Step 2. Click anywhere inside the code area and press the CTRL + F keys to open the Blogger search box.

Once you have added the Contact form widget go to Blog Title → Template → Edit HTML.
Now add the below given CSS code just above ]]></b:skin> .
#contact_wrap h3:after {
content: ' ';
position: absolute;
bottom: -10px;
right: 0;
width: 0;
height: 0;
border-style: solid;
border-width: 0 0 10px 10px;
border-color: transparent transparent transparent #333;
}
#ContactForm1_contact-form-name{
width: 270px;
height:auto;
margin: 5px auto;
padding: 10px 10px 10px 40px;
background:#f6f6f6 url(https://blogger.googleusercontent.com/img/b/R29vZ2xl/AVvXsEhGeC9ho_mLiBRf8-J7edNd-L0QIa19YIYvkZc9lyIQtxP9NxCN0SkxLrYwLLERa3P4INoDIf8q-0dc4OhBIXGFRDal-rJV5dKfZq2YDvJbUCxy6hAWWFRhh1t8KHAehBiQG-wPCuRRLoQ/s1600/user.png)no-repeat 10px center;
color:#777;
border:1px solid #ccc;
-webkit-border-radius: 4px;
-moz-border-radius: 4px;
border-radius: 4px;
-webkit-box-shadow: rgba(0, 0, 0, 0.247059) 0px 1px 3px inset, #f5f5f5 0px 1px 0px;
box-shadow: rgba(0, 0, 0, 0.247059) 0px 1px 3px inset, #f5f5f5 0px 1px 0px;
}
#ContactForm1_contact-form-email{
width: 270px;
height:auto;
margin: 5px auto;
padding: 10px 10px 10px 40px;
background: #f6f6f6 url(https://blogger.googleusercontent.com/img/b/R29vZ2xl/AVvXsEhVlWjDmkPfmsf5dQcAwhhPROoloQIOsPE7ak2oNECAbrIo1LdlmKZ2Qeh_DSP74LyB238H2HJj0rTAWRhIoq-PZdMhSYEQwCxFYp-oqoglmmnH9TnjbcZd0yJObWtpczFRwrIp6nKndhA/s1600/pen.png)no-repeat 10px center;
color:#777;
border:1px solid #ccc;
-webkit-border-radius: 4px;
-moz-border-radius: 4px;
border-radius: 4px;
-webkit-box-shadow: rgba(0, 0, 0, 0.247059) 0px 1px 3px inset, #f5f5f5 0px 1px 0px;
box-shadow: rgba(0, 0, 0, 0.247059) 0px 1px 3px inset, #f5f5f5 0px 1px 0px;
}
#ContactForm1_contact-form-email-message{
width: 270px;
height: 150px;
margin: 5px auto;
padding: 10px 10px 10px 40px;
font-family:Arial, sans-serif;
background: #f6f6f6 url(https://blogger.googleusercontent.com/img/b/R29vZ2xl/AVvXsEjYuJnypnmJe5ERTAZK8MD6YIjYyMujY6VIlBRbDmTr8uOu4jSw_RbQO8EfwBtHdX-rj2twxCf4qSjbCRPw8-A-BGCGURvivz_Yn6Y7ETBY_kj_NXVBCQdg-KNSeP3nJIflOrdi2o5TuB0/s1600/msg2.png)no-repeat 10px 10px;
color:#777;
border:1px solid #ccc;
-webkit-border-radius: 4px;
-moz-border-radius: 4px;
border-radius: 4px;
-webkit-box-shadow: rgba(0, 0, 0, 0.247059) 0px 1px 3px inset, #f5f5f5 0px 1px 0px;
box-shadow: rgba(0, 0, 0, 0.247059) 0px 1px 3px inset, #f5f5f5 0px 1px 0px;
}
#ContactForm1_contact-form-submit {
width: 95px;
height: 30px;
float: right;
color: #FFF;
padding: 0;
cursor:pointer;
margin: 25px 0 3px 0 0;
background-color:#005a8a;
border-radius:4px;
text-shadow: 1px 0 0 #1f4962;
-webkit-box-shadow: inset 0 0 35px rgba(0,0,0,0.3),0px 1px 5px #666;
-moz-box-shadow: inset 0 0 35px rgba(0,0,0,0.3),0px 1px 5px #666;
box-shadow: inset 0 0 35px rgba(0,0,0,0.3),0px 1px 5px #666;
background-color: #3689b9;
border:1px solid #194f6d;
}
#ContactForm1_contact-form-submit:hover {
background:#4c9bc9;
}
#ContactForm1_contact-form-error-message, #ContactForm1_contact-form-success-message{
width: 320px;
margin-top:35px;
}
After adding the code save the template.
Step 3 : Adding the HTML in Page
First of all we need to create a new page and to do this firstly go to Blog Title → Pages → New Page → Blank Page. Page editor will open, now click on HTML tab and paste the below given code in it.
<div id="contact_wrap">
<h3>Contact Us</h3>
<form name="contact-form">
<input id="ContactForm1_contact-form-name" name="name" placeholder="Name" size="30" type="text" value="" />
<input id="ContactForm1_contact-form-email" name="email" placeholder="Email" size="30" type="text" value="" />
<textarea cols="25" id="ContactForm1_contact-form-email-message" name="email-message" placeholder="Message" rows="5"></textarea>
<input id="ContactForm1_contact-form-submit" type="button" value="Submit" />
<div style="max-width: 222px; text-align: center; width: 100%;">
<div id="ContactForm1_contact-form-error-message">
</div>
<div id="ContactForm1_contact-form-success-message">
</div>
</div>
</form>
</div>
After adding the above code, publish the page.
You are done now. Now you and your visitors can see this awesome and cool contact form widget .
Backup Image.


Comments
Post a Comment