Customize Blogger Contact Form
So most of you are aware of the recent gadget added to blogger widget directory and that is a small contact form with two input fields for name and Email and a text area for writing the message. We use a complex PHP Form for our contact page but blogger has made it extremely easy for you guys. Ever wondered how to customize this simple form into a professional looking contact form that may give a complete new boost to your overall blog look? Fortunately readers will be the first to learn this trick today. Plus you will also learn how to add this form anywhere on your blog! I had sometime today so I designed a custom version of this contact form by adding several new CSS3 effects and also added an additional button called "Clear" that will reset and erase the message for your visitors if incase they wish to rewrite a new message
Note: We have added the contact Form to a static page and also the sidebar. Just to show that you can add this Custom Form anywhere you want. On static page the Form on sidebar wont display but it will display on all other pages.
Tutorial Guide:
We have divided this tutorial in 4 parts:
Adding the Normal Contact form widget to sidebar
Controlling Widget Display
Customize the Contact Form
Finally Add the Customized contact Form to Sidebar, Post or Static Page
By default blogger will allow you to add this widget to your sidebar only but you can easily embed its code on any post or static page easily by copying the HTML code by viewing the browser source file (Ctrl + U). I have taken all the headache so you will only need to follow these easy steps below:
1. Adding The CSS
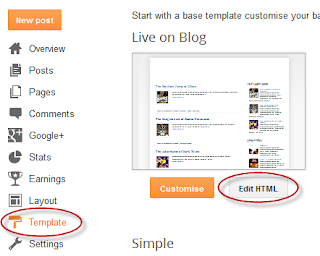
Step 1. Go to Blogger Dashboard > Template > click on the Edit HTML button:

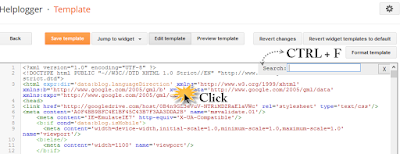
Step 2. Click anywhere inside the code area and press the CTRL + F keys to open the Blogger search box.

Once you have added the Contact form widget go to Blog Title → Template → Edit HTML.
Now add the below given CSS code just above </head> .
Just above it paste the following conditional statement that will hide the widget on sidebar:
The above code will hide the Normal Contact Form on a Static Page only. If incase you wish to add the Custom contact Form to a Post then you may use the following code instead:
Replace URL OF Selected Post with the URL of the Post where you will add the contact form.
In our DEMO we have added the contact form to a static page therefore we have used the first code in step#5.
Note: We have added the contact Form to a static page and also the sidebar. Just to show that you can add this Custom Form anywhere you want. On static page the Form on sidebar wont display but it will display on all other pages.
Tutorial Guide:
We have divided this tutorial in 4 parts:
Adding the Normal Contact form widget to sidebar
Controlling Widget Display
Customize the Contact Form
Finally Add the Customized contact Form to Sidebar, Post or Static Page
1. Adding contact Form to Sidebar:
By default blogger will allow you to add this widget to your sidebar only but you can easily embed its code on any post or static page easily by copying the HTML code by viewing the browser source file (Ctrl + U). I have taken all the headache so you will only need to follow these easy steps below:
- Go to blogger > Layout
- Click Add a gadget
- Next click on "More Gadgets" and then choose the first widget as shown below:
4. Now you have successfully added or in other words registered your contact form widget with blogger.
5. Don't Remove this gadget and leave it intact. If you tried to ever remove it then the Customized contact form that we will code wont work. We will surely Hide this widget from sidebar.
2. Controlling Widget Display
The contact form that you created has an ID #ContactForm1 , using this ID you can easily locate the HTML code of the normal form in your blog source file. Well we have already done all the work so you simply need to follow these easy steps:
Hide The Normal Form on sidebar
1. Adding The CSS
Step 1. Go to Blogger Dashboard > Template > click on the Edit HTML button:

Step 2. Click anywhere inside the code area and press the CTRL + F keys to open the Blogger search box.

Once you have added the Contact form widget go to Blog Title → Template → Edit HTML.
Now add the below given CSS code just above </head> .
Just above it paste the following conditional statement that will hide the widget on sidebar:
<b:if cond='data:blog.pageType == "static_page"'>
<style>
#ContactForm1{ display:none!important;}
</style>
</b:if>
The above code will hide the Normal Contact Form on a Static Page only. If incase you wish to add the Custom contact Form to a Post then you may use the following code instead:
<b:if cond='data:blog.url == "URL OF Selected Post"'>
<style>
#ContactForm1{ display:none!important;}
</style>
</b:if>
Replace URL OF Selected Post with the URL of the Post where you will add the contact form.
In our DEMO we have added the contact form to a static page therefore we have used the first code in step#5.
3. Customizing The Contact Form - The Fun Part!
In the first part of our series you learnt how to add a contact Form to your BlogSpot blog and control its display settings. Today you will learn how to change its stylesheet to reflect your custom styles with a more appealing design. You will learn today how to customize the Form input fields, add icons to it, add a "Clear Button" and play several tricks with your custom form. The form is built using XHTML Get or Post Methods unlike PHP Forms which are used widely today. If you have not referenced the first part of our tutorial then kindly read it first:
Now you will need to create a Static Page where we will add the HTML code for our new contact form.
- Go To blogger > Pages
- Choose a Blank Page
- Give it any title you like. I recommend "Contact Us"
- Switch to its HTML mode and paste the following HTML code inside it:
<div class='form'>
<!-- Custom Contact Form By TECH Starts -->
<form name='contact-form'>
<!-- Name Field -->
<input class='contact-form-name' id='ContactForm1_contact-form-name' name='name' value="Name" size='30' type='text' onblur='if (this.value == "") {this.value = "Name";}' onfocus='if (this.value == "Name") {this.value = "";}' />
<p></p>
<!-- Email ID Field -->
<input class='contact-form-email' id='ContactForm1_contact-form-email' name='email' value="Email ID" size='30' type='text' onblur='if (this.value == "") {this.value = "Email ID";}' onfocus='if (this.value == "Email ID") {this.value = "";}'/>
<p></p>
<!-- Message Field -->
<textarea class='contact-form-email-message' id='ContactForm1_contact-form-email-message' name='email-message' value='Leave Your Message..' onblur='if (this.value == "") {this.value = "Leave Your Message..";}' onfocus='if (this.value == "Leave Your Message..") {this.value = "";}'></textarea>
<p></p>
<!-- Clear Button -->
<input class='contact-form-button contact-form-button-submit TECH-button-color' type='reset' value='Clear'/>
<!-- Send Button -->
<input class='contact-form-button contact-form-button-submit TECH-button-color' id='ContactForm1_contact-form-submit' type='button' value='Send'/>
<p></p>
<!-- Validation -->
<div style='text-align: center; max-width: 222px; width: 100%'>
<p class='contact-form-error-message' id='ContactForm1_contact-form-error-message'></p>
<p class='contact-form-success-message' id='ContactForm1_contact-form-success-message'></p>
</div>
</form>
<!-- Custom Contact Form By TECH Ends -->
</div>
5. Don't switch to Compose Mode of your Blogger Editor else the code will get messed up due to your Editor settings. Save and Publish your Page.
Now if you visit your contact page you will see the default contact form with blue button. Its time to customize its default styles.
Customizing The Form:
Go To Blogger > Template
Click "Edit HTML"
Update: Search for </head> and just above it paste the following CSS code:
<style>
/*---- Compatible contact Form by TECH -----*/
.contact-form-name, .contact-form-email, .contact-form-email-message {
max-width: 220px;
width: 100%;
font-weight:bold;
}
.contact-form-name {
background: #FFF url(https://blogger.googleusercontent.com/img/b/R29vZ2xl/AVvXsEiUba-0ZCMnuf9Q0Bw0jcJQS92748C6hrFPHRdBsH6xKgi9yUtV-w18XKMoxAPRd91rhiOhbsFjQ-_wPwnXJisjR3n1KdklAR84K9QfXm5FHQU6EL3BRIf2caO0dh7iLzJJdbXrNyXFXuY/s320/name.png) no-repeat 7px 8px;
background-color: #FFF;
border: 1px solid #ddd;
box-sizing: border-box;
color: #A0A0A0;
display: inline-block;
font-family: Arial,sans-serif;
font-size: 12px;
font-weight:bold;
height: 24px;
margin: 0;
margin-top: 5px;
padding: 5px 15px 5px 28px;
vertical-align: top;
}
.contact-form-email {
background: #FFF url(https://blogger.googleusercontent.com/img/b/R29vZ2xl/AVvXsEgg-X4hk_vs4yk1kp_ChTaTdQ92J-Xdpf0m9zirrgcL8aGixVcCT89JU6Lpw54xRvzr_le62LkialPEpc_r-Ub3eKdW8NQ532esWnwWDhDnwgAJu5kY1tY1tjsWfZQG66sVYFvAW1hOfyA/s320/email.png) no-repeat 7px 10px;
background-color: #FFF;
border: 1px solid #ddd;
box-sizing: border-box;
color: #A0A0A0;
display: inline-block;
font-family: Arial,sans-serif;
font-size: 12px;
font-weight:bold;
height: 24px;
margin: 0;
margin-top: 5px;
padding: 5px 15px 5px 28px;
vertical-align: top;
}
.contact-form-email:hover, .contact-form-name:hover{
border: 1px solid #bebebe;
box-shadow: 0 1px 2px rgba(5, 95, 255, .1);
padding: 5px 15px 5px 28px;
}
.contact-form-email-message:hover {
border: 1px solid #bebebe;
box-shadow: 0 1px 2px rgba(5, 95, 255, .1);
padding: 10px;
}
.contact-form-email-message {
background: #FFF;
background-color: #FFF;
border: 1px solid #ddd;
box-sizing: border-box;
color: #A0A0A0;
display: inline-block;
font-family: arial;
font-size: 12px;
margin: 0;
margin-top: 5px;
padding: 10px;
vertical-align: top;
max-width: 350px!important;
height: 150px;
border-radius:4px;
}
.contact-form-button {
cursor:pointer;
height: 32px;
line-height: 28px;
font-weight:bold;
border:none;
}
.contact-form-button {
display: inline-block;
zoom: 1; /* zoom and *display = ie7 hack for display:inline-block */
*display: inline;
vertical-align: baseline;
margin: 0 2px;
outline: none;
cursor: pointer;
text-align: center;
text-decoration: none;
font: 14px/100% Arial, Helvetica, sans-serif;
padding: .5em 2em .55em;
text-shadow: 0 1px 1px rgba(0,0,0,.3);
-webkit-border-radius: .5em;
-moz-border-radius: .5em;
border-radius: .5em;
-webkit-box-shadow: 0 1px 2px rgba(0,0,0,.2);
-moz-box-shadow: 0 1px 2px rgba(0,0,0,.2);
box-shadow: 0 1px 2px rgba(0,0,0,.2);
}
.contact-form-button:hover {
text-decoration: none;
}
.contact-form-button:active {
position: relative;
top: 1px;
}
.TECH-button-color {
color: #fef4e9;
border: solid 1px #da7c0c;
background: #f78d1d;
background: -webkit-gradient(linear, left top, left bottom, from(#faa51a), to(#f47a20));
background: -moz-linear-gradient(top, #faa51a, #f47a20);
filter: progid:DXImageTransform.Microsoft.gradient(startColorstr='#faa51a', endColorstr='#f47a20');
}
.TECH-button-color:hover {
background: #f47c20;
background: -webkit-gradient(linear, left top, left bottom, from(#f88e11), to(#f06015));
background: -moz-linear-gradient(top, #f88e11, #f06015);
filter: progid:DXImageTransform.Microsoft.gradient(startColorstr='#f88e11', endColorstr='#f06015');
border-color: #F47C20!important;
}
.TECH-button-color:active {
color: #fcd3a5;
background: -webkit-gradient(linear, left top, left bottom, from(#f47a20), to(#faa51a));
background: -moz-linear-gradient(top, #f47a20, #faa51a);
filter: progid:DXImageTransform.Microsoft.gradient(startColorstr='#f47a20', endColorstr='#faa51a');
}
</style>
<!--[if IE 9]>
<style>
.contact-form-name {
background: #FFF url(https://blogger.googleusercontent.com/img/b/R29vZ2xl/AVvXsEiUba-0ZCMnuf9Q0Bw0jcJQS92748C6hrFPHRdBsH6xKgi9yUtV-w18XKMoxAPRd91rhiOhbsFjQ-_wPwnXJisjR3n1KdklAR84K9QfXm5FHQU6EL3BRIf2caO0dh7iLzJJdbXrNyXFXuY/s320/name.png) no-repeat 7px 0px;
}
.contact-form-email {
background: #FFF url(https://blogger.googleusercontent.com/img/b/R29vZ2xl/AVvXsEgg-X4hk_vs4yk1kp_ChTaTdQ92J-Xdpf0m9zirrgcL8aGixVcCT89JU6Lpw54xRvzr_le62LkialPEpc_r-Ub3eKdW8NQ532esWnwWDhDnwgAJu5kY1tY1tjsWfZQG66sVYFvAW1hOfyA/s320/email.png) no-repeat 7px 6px;
}
</style>
<![endif]-->
<style>
@media screen and (-webkit-min-device-pixel-ratio:0) {
.contact-form-name {
background: #FFF url(https://blogger.googleusercontent.com/img/b/R29vZ2xl/AVvXsEiUba-0ZCMnuf9Q0Bw0jcJQS92748C6hrFPHRdBsH6xKgi9yUtV-w18XKMoxAPRd91rhiOhbsFjQ-_wPwnXJisjR3n1KdklAR84K9QfXm5FHQU6EL3BRIf2caO0dh7iLzJJdbXrNyXFXuY/s320/name.png) no-repeat 7px 6px;
padding: 15px 15px 15px 28px;
}
.contact-form-email {
background: #FFF url(https://blogger.googleusercontent.com/img/b/R29vZ2xl/AVvXsEgg-X4hk_vs4yk1kp_ChTaTdQ92J-Xdpf0m9zirrgcL8aGixVcCT89JU6Lpw54xRvzr_le62LkialPEpc_r-Ub3eKdW8NQ532esWnwWDhDnwgAJu5kY1tY1tjsWfZQG66sVYFvAW1hOfyA/s320/email.png) no-repeat 7px 8px;
padding: 15px 15px 15px 28px;
}
.contact-form-email:hover, .contact-form-name:hover{
padding: 15px 15px 15px 28px;
}
.contact-form-button {
height: 28px;
}
}
</style>
The above Stylesheet will work just fine with all browsers including Internet Explorer. The code has been made compatible to work fine with all major browsers like IE, Mozilla and Webkit browsers.
To change button colors edit the class .TECH-button-color
To change the button color on mouse hover edit the class .TECH-button-color:hover and for active mode edit .TECH-button-color:active
5. Save your template and you are all done!
4. Add the Form anywhere you like!
Now if you wish to add the form to your sidebar or post then simply follow these steps:
To add the form to sidebar. Copy the HTML code in Step#4 and paste it inside HTML/JavaScript Widget
To add the form to Post editor, switch to HTML mode and paste the code in Step#4 inside it
Your Views:
I just hope this tutorial would be helpful for all of you. The steps are extremely simple and the codes are carefully written. You can now create a contact form to let your clients request you for a price quote or add it to let your readers contact you in person. Wish you all the best with your blogging endeavors. I will make sure you enjoy it to your fullest. Peace and blessings buddies :)
BACKUP IMAGE:

BACKUP IMAGE:


Comments
Post a Comment